Rogue Valley
Red climbs the cliffs of Rogue Valley to take down Bad Bessie.
Chapter 8
"It was hard enough getting to Clementine Falls through Rogue Valley even before it turned into a hideout for murderers."
Before the mission starts, you'll be given the option to purchase the following items.
- Twin Revolvers - $800
- Dynamite - $220
If you can afford them, the Twin Revolvers are very useful for the boss fight ahead.
Bad Bessie stands with her arms folded, looking down the valley as the camera pans back through the level.

It ends up at Red who is set to begin his climb towards her.

You must successfully pass at least 3 of these 4 targets.
- Accuracy: 66%
- Damage Taken: 100%
- Time: 5:00
- Best Combo: $200
When the level starts, you're told to "Watch your step. Falling from high distances can cause damage", which is something to be aware of. Fall damage can be worse than getting shot depending on the height.

The main goal for this level is to continue forward and climb the rocks of the valley to reach the end where Bad Bessie is waiting. There are numerous areas where you'll have to deal with groups of enemies on the way. Interestingly, this level also features 3 "secrets" which you can find to acquire and unlock weapons, ammo or health. There's more details below in the Bounty Hunter mode section.
Begin by climbing up the rocks in front of you. Keep to the right, as there's almost always a lower path down to the left, and climb up more rocks. Eventually you'll reach a small bridge and there are 4 enemies on the other side. One higher up on the cliffs ahead and three behind the small boulders to the right.

Before (or after) attacking these 4 enemies, drop off the side of this small bridge and you'll find a small grey crate on the ledge below it.

Throw a knife or shoot it with your weapon to open it and usually a weapon will pop out. If this is your first playthrough, the weapon might be one you don't already own which will unlock a journal entry with it. You'll also find some Dyamite right next to the crate which, if you've been saving money so far, offers you the chance to acquire some for free.
The enemies shouldn't pose too much of a threat, but if you're quick and accurate, you can probably take all four out in a single combo which may be worth a good $100+. If you're really good, you could even hit the $200 target here towards your Excellent rating.
Once you're past them, there's a large sloped rock which you can walk up to reach a higher level. As you reach about half way, two enemies will appear and start shooting at you from the other side of the valley. If you have a rifle, it's a good time to whip it out and use R3 to zoom in to make them easier to take down.
Once the two riflemen are down, continue to the top of the rock where you'll immediately run into a large ambush. There are two regular soldiers, a Native American and a big guy who will pick up and throw large boulders at you. As always, aim for headshots to take them down as quickly as you can.
Slightly further up the cliffs to the right is another gunslinger who needs to be taken down, then as you approach his position, three more enemies will appear ahead - two riflemen lower down next to a large rock and a boulder thrower on the level above. There's a big boulder next to you as you climb up so use this for cover and to dodge the flying boulders until you're able to take them down.
Once you've killed the two riflemen and the boulder thrower, you'll notice there's a shadowy gap to the right side before you climb up to where the boulder thrower was.

If you drop down into the shade, it'll take you through a small cave and lead you to a small path low down on the left of the valley. Follow it along and you'll find the second secret crate in a small alcove.

Shoot it to grab a treat. If you're low on health, it's quite likely it'll be a health potion you'll get, otherwise expect some ammo.
You can jump and grab to climb back up into the cave when you're done, which will save time and a loss of health from fall damage, otherwise you'll have to follow the path back towards the start of the level to get back up.
Climb up to where the boulder thrower was and you'll immediately be thrown into another firefight, although there's a lot of cover here so you can move slowly and take out the enemies as you see them around the rocks. Two soldiers will probably run towards you as you climb up, so start with them, then there's usually one more to the left, a Native American to the right and another enemy higher up on the next level further ahead.

Once they're dealth with, continue onwards and climb up to the next level and you'll come to a broken bridge. It's possible to jump the gap, grab on and pull yourself up if you time it correctly, although this certainly isn't a platformer and jumping is a bit awkward in Red Dead Revolver, so it might be luck whether you make it or not. If you miss, don't worry, you won't die, although you will take a bit of fall damage. You can climb up some rocks to get to the other side either way.
As soon as you reach the other side of the bridge, you're met by two big enemies who want a duel.

This will be the first time you've had to face two enemies in a duel so far which might pose a bit of a challenge.

You'll want to pull out your pistol, try to paint at least 2 decent targets on the right enemy - ideally one in the head - then quickly move the right analog stick to the left and paint another 2 or 3 targets on the left enemy.

Be patient and wait for the cursor to go red, but don't waste any time when it does as they'll shoot you dead if you don't take them both out in the duel.


Continue onwards and you'll reach a bit of a fork in the road. You can either climb up and go left towards a dead end blocked by boulders, or right, through a dark cave.

Keep left and head towards the dead end. As you reach it, a cutscene will kick in, followed by a 'secret shop'. Don't skip the cutscene as you risk closing the shop before you've had a chance to see it.
"Hey, friend" says the familiar face of Curly Shaw, the old trader guy we met in Chapter 2, who crawls through a tiny hole in the rock wall. He'll offer you the chance to purchase a one-off unique item which will boost your max health.

After the duel with 2 enemies, instead of going down and through the tunnel to the right, keep left and head to the dead-end ahead. Curly Shaw will show up and crawl through the rocks, telling you he knows a shortcut. Don't skip the cutscene or you might close the shop as soon as it opens.
If you fail to purchase the item now, keep him alive as he heads down through the cave below, inluding taking out a sniper on the other side of the valley to the left as you exit the cave. If you do, he'll drop a bag of money worth $1500 which is enough to buy the Snakebite Kit.
- Snakebite Kit - $1500
- Increases Max Health
"Follow me, I know a short cut" says Curly after you've finished browsing his secret shop. He leads Red to the cave entrance we specifically avoided before. "Friend! You go ahead, I'll follow you!" says Curly, motioning for Red to take the lead.
You'll now start again at the cave entrance. There are two enemies inside, a soldier and a Native American, so take them down down as quickly as you can to protect Curly.
Immediately run out of the exit and keep left. There are two snipers high on the cliffs to the left on the other side of the valley and they'll pretty much shoot Curly the second he appears. Have a rifle prepared and you may even want to use Deadeye to give you more time to find and target the riflemen. There are two of them, but in my experience one can get stuck behind a boulder so he may not be a problem.
Assuming you kill the snipers and keep Curly alive, he'll stand on a rock just outside the cave entrance and drop a bag of money. Pick it up quickly by running close to it and you'll receive $1500. If you couldn't afford the Snakebite Kit before, he's given you the exact right amount to grab it now. Press Square to talk to him and you'll be able to view his shop again to buy it.
Continue onwards and climb four or five sets of rocks as you make your way up. As you do so, an enemy will appear at the other side of the valley so use a rifle to take him out. Don't climb any further though if you're trying to collect the secrets!
Once you've climbed up the rocks after exiting the cave, immediately stay left and drop down the other side, following a lower ledge around under a small bridge like structure made of rock. The final secret crate is hidden in the shade just around this rock.

Shoot it to open it up and grab another treat.
Continue climbing the rocks all of the way to the top where you'll finally come face to face with Bad Bessie.
A Native American bowman aims at Red as a bunch of other enemies appear with their guns drawn.

"I could hear you coming, little man. You think you can handle taking on a woman like me? You either drunk or crazy" asks Bad Bessie as she appears from a small wooden shack in the middle of the area.

My best advice for the boss fight is to take out the additional enemies first. There will be a number of respawning enemies who will continually reappear on the bridge and higher cliffs around the battle area you'll need to be aware of later in the fight, but clearing out the enemies on the ground level will certainly save a lot of trauma at the start.

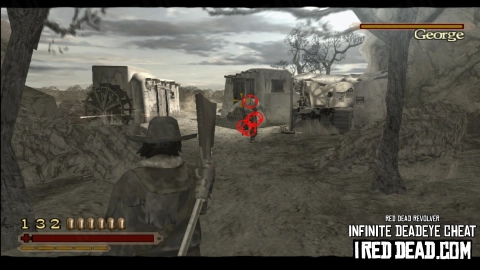
There's a lot of cover, so there's no need to stand in the open taking damage. Bessie will usually just run around the whole area in a circle, firing off shots at you as she passes. If you can lock onto her with Deadeye, use the opportunity to deal some damage, although her health bar is quite substantial so you ideally want to focus on headshots.
If Bessie gets close to you, she'll pull out her whip and give you a whack which does a small amount of damage, but definitely isn't something you want to let her do regularly.
The Twin Revolvers are one of the best weapons to use on her, assuming you purchased them at the start, as each shot you hit her with should slightly stun her. Given you'll have 12 shots to fire before you reload, this will give you a chance to correct your aim and start popping off headshots which should knock her health bar down quite a lot.
Once you get her below half health, more enemies will appear on the cliffs above including a boulder thrower, giving you something else to be concerned about. The good thing with him is that his boulder can actually damage Bessie if she manages to get caught in the blast, so it might actually be worth leaving him alive as long as you dodge his boulders.
Stick to the Twin Revolvers if you have them and blast away with as many headshots as you can and eventually you should be able to take her down.
After collapsing in a heap following her death, Red approaches Bad Bessie's body saying "Hate to kill a lady" before picking her up and carrying her away.


Post-Mission Rewards
The following rewards are unlocked on the score screen after passing the mission.
- Completion
- Bounty: Bad Bessie - $250
- Good Rating
- Showdown Character: Cooper + Shop Item: "Large Barrel"
- Excellent Rating
- Showdown Character: Bad Bessie + Shop Item: "Harmonica"
After completing the story, you'll be able to replay each mission in "Bounty Hunter Mode" which includes an optional objective to complete. Beating the mission and completing the objective will provide a reward.

- Objective
- Find the 3 treasures.
- Reward
- Showdown Character: Sidney "Sissy" Fess + Shop Item: "Bloody Rock"
Tips
There are three crates hidden throughout the level which you'll need to shoot to open. Once you do so, you'll be provided with a weapon or medicine. The cheats don't necessarily help with this objective, but you'll need to beat the mission anyway so you might as well turn them all on to make it easier.
Treasure Locations
- From the start of the level, climb up the cliffs on the main path until you reach a small bridge. It's not very far into the level. From there, drop down to the side of the bridge and you'll find the crate down to the left. Shoot it to open it.
- When you reach an area with a sloped stone ramp leading up to the first batch of enemies who will throw boulders at you, there's a hidden path to the right which will take you through a small tunnel and you'll end up on a path down to the left of the area. You can also just drop down from the higher section where the boulder enemy battle occurs although you'll probably lose some health. The crate is at the end of the lower path. Shoot it to open it.
- Right before you reach the final battle area of the level, as you make your way up towards a wooden shack with a long bridge in the distance, drop down to the left and loop around the end of the cliff where you'll find the crate tucked away. Once again, shoot it to open it. If you got them all, you should be told that the objective has been completed now.
All Bounty Hunter challenges are much easier if you unlock and enable the "Invincibility", "Infinite Deadeye" and "Golden Gun" cheats. For more info, read about Cheats in Red Dead Revolver.
Next Mission
After this level, you'll end up in Brimstone again where you can purchase more items.
While there, visit the Sheriff's office to start the next story mission.