Bounty Hunter
Red heads into Twin Rocks where he's involved in a shootout after speaking with a traveling salesman.
Chapter 2
"Little outposts like this crop up all over the West, to the disadvantage of many honest travelers."
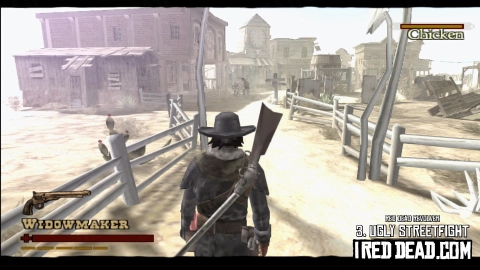
Red arrives in the small outpost of Twin Rocks with his dog, clutching his hand that is starting to heal.

As he walks past a cart, a man crawls out from under it and calls for Red's attention. Red immediately draws his gun but it turns out the man is a salesman who tells Red it's too dangerous for a man to be walking around in these parts.

"I deal in weapons and goods. See?" explains the trader.

You're now taken into a "Shop" menu where you can browse and purchase a variety of items. Some of the items you can buy are useful, such as new weapons, ammo or upgrades, however most of the items have no effect in game besides unlocking journal pages or characters for use in Showdown (multiplayer mode).

If you want to complete the journal, you'll need to purchase or acquire every item in the game. You earn money by shooting and killing enemies. If you combo enemy kills together - by killing enemies within a few seconds of each other - you'll multiply your cash reward. You'll also receive a reward at the end of each chapter for defeating the bounty and the rewards increase as you get further through the story.
You should be aware that some items are only available for purchase once, or only until a set point in the game, so if you miss them or can't afford them, you'll need to wait until your next full playthrough to get them. Luckily additional playthroughs will allow you to keep your unlocks and your cash making it easier to buy things the second time through.
Don't worry about collecting all of the shop items on your first playthrough as it's pretty much impossible anyway. Just focus on getting through the game and you can collect everything on your next run through, although try to purchase any weapons or upgrades whenever you can afford them to make the game a bit easier.
Some of the more expensive shop items can actually be unlocked by completing challenges, such as getting Excellent ratings on specific levels or beating them on Bounty Hunter mode. You can save quite a bit of cash by doing this.
See our Shop Items guide for a full breakdown of where you can acquire each item in the game.
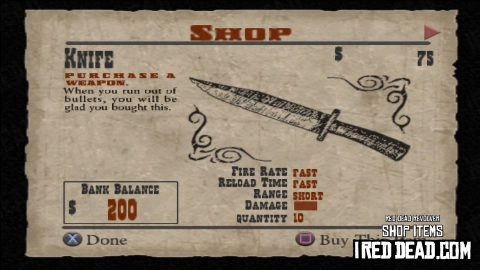
Before the mission starts, you'll be given the option to purchase the following items.
- Knife - $75
- Whiskey Bottle - $19
- Ruined Poncho - $6
- Open Sign - $760
- Automatically unlocked if you complete Chapter 2 - Bounty Hunter on Bounty Hunter mode
- Burnt Gun Case - $1000
- Automatically unlocked if you get an Excellent rating in Chapter 1 - Bull's Eye
The trader explains to Red "I would offer you more, but a gang of ruffians done run me offa my..." before he is cut off by two bandits who approach him. One of the men throws the trader to the ground asking "You holding out on us, old man?" while the other points aggressively at Red and asks "What the hell you looking at?".

His buddy then suggests they fill Red full of lead.

You must successfully pass at least 3 of these 4 targets.
- Accuracy: 66%
- Damage Taken: 100%
- Time: 3:50
- Best Combo: $200
As soon as you're in control of Red, you'll be in a close quarters gun fight against the two men from the cutscene, Twiggy Phelps and Smitty. Immediately pull out your pistol and try to aim for headshots while strafing left and right to make yourself harder to hit. Because your pistol is fairly weak, it might take multiple headshots before you take the enemies down.

Once they're both dead, the game will explain you can change weapons using the Left or Right D-Pad buttons.
Two enemies high up on rocks take aim at Red with rifles.

Back in control of Red, you're offered another training section as you stand near the trader's cart. You can press Square to begin, or Triangle to skip. If it's your first playthrough, I recommend you complete it.

Cover Training
The game explains that you can press the Square button when next to cover objects to "attach". This makes Red take cover against the object, keeping him safe from enemy fire. You're told "Move to the edge of the cover object to continue" so move the left analog stick to the left or right to move to the end of the cart.
The game then explains that you can target while taking cover by holding L1 and aim by moving the right analog stick. Pressing R1 will allow you to fire shots from cover. To return to cover, release L1 and R1. Press Square to detatch from cover.

The first thing you'll probably want to do is switch to a rifle if you have one. When aiming rifles, you can press the R3 button to zoom in which makes it easier to target enemies in the distance. If you don't, you can still shoot the rifle enemies on top of the rocks, but you'll need to aim slightly above their heads as the bullets will drop as they travel long distances.
Kill the two rifle enemies on top of the large rocks, then a pistol enemy to the left who will be taking cover behind a boulder. Two more enemies will pop in and out of cover further down the road so wait for them to pop out and fire away.

You're not forced to stay in cover, however, if you do exit the cover while on the tutorial, the game will try to get you to start it again. Doing this doesn't cause the enemies to respawn however, it'll just walk you through how you can get in and out of cover, move and aim again. Don't feel obliged to do it again as it's not mandatory, you can exit cover and run towards the enemies if you're having trouble hitting them.
If you do continue the tutorial, eventually you'll be told "Try taking cover on the next boulder". You can now exit the cover and run towards the boulder on the left where the enemy was. As you reach it, you're told "Press towards objects that will provide cover and press Square to take cover".
Once you've killed all 5 of the enemies, you're taken into another tutorial as the game says "Time to learn the art of the "Deadeye"! You can press Square to begin or Triangle to skip it.
Deadeye Training
You're told to draw your gun by holding the L1 button. "When you have one or more deadeye bars... Paint targets with the right analog stick". The screen will go into black and white, slow motion, and you're able to aim your gun towards the enemy. As you move the crosshair over parts of their body, the target will be marked with a red target circle. You can mark as many targets as you have bullets in your gun, so at this point you'll be able to mark 6. You can only mark each body part once however, so unfortunately you can't just lock in 6 headshots.

The game will then tell you "Press the R1 button to fire at your acquired locks". Doing so will see Red automatically fire off 6 shots that will hit the enemy exactly where you locked the targets.
"Congratulations, you've learned to use deadeye!" says the game. Deadeye will be very useful throughout the story to help stun, if not kill enemies, particularly if you're being surrounded. The slow motion is also useful to help you dodge enemy fire.
You'll be given the option to replay the tutorial but once you understand how it all works, you can press Triangle to continue the mission.
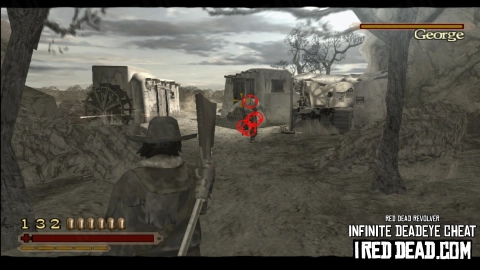
Three angry looking men appear from the buildings at the end of the street. One huge meaty looking guy called Oaf, a bearded goon called George and a butcher covered in blood who is known as "Bloody" Tom who says "I'm going to make mincemeat out of you!". The camera then zooms out to show the three of them with guns drawn pointing towards Red.

Back in control of Red, you'll notice there are three health bars displayed at the top right of the screen. "Tom", "Oaf" and "George". These guys are mini-bosses and you'll encounter something similar at the final part of each level.

Backtrack down the street while continuing to aim towards the enemies. As always, try to go for headshots as it'll knock out larger chunks of their health bar. Most bosses will take very little damage from shots to the arms or legs, but headshots are the quickest way to take them down and they'll also temporarily stun the enemies when they land. Don't be afraid to press the R2 button while aiming to enter Deadeye mode so you can paint the targets and take out a decent chunk of damage at once.
Oaf will generally charge towards you and fire away with his pistol, Tom will stay at a distance and fire off shots but will swing away with a knife if you get too close and George only seems to appear once the first two are dead.
Remember, getting headshots on the enemies will stun them as well as taking away their health, so ensure you've got your aim spot on and shoot George in the head repeatedly to stop him from getting too close to you. Keep moving and firing away and eventually you'll take him down and the game will show him fall to the ground in slow motion.

"Damn, son! You done killed them all! You know you can get quite a handsome bounty for these fellas, if you took them down to Sheriff O'Grady in Widow's Patch" explains the trader as he inspects the bodies.

"I'll be taking your cart" responds Red. "Whatever you say, bounty hunter" says the trader.

The following rewards are unlocked on the score screen after passing the mission.
- Completion
- Bounty: "Bloody" Tom - $30
- Good Rating
- Showdown Character: "Bloody" Tom + Shop Item: "Stained Clothing"
- Excellent Rating
- Showdown Character: "Big Oaf" Whitney + Shop Item: "Stethoscope"
After completing the story, you'll be able to replay each mission in "Bounty Hunter Mode" which includes an optional objective to complete. Beating the mission and completing the objective will provide a reward.

- Objective
- Clear the level without being hit.
- Reward
- Showdown Character: "Curly" Shaw + Shop Item: "Open Sign"
Tips
This objective isn't related to not losing any health, you must avoid being hit at all. If you have the Invincibility cheat enabled, you'll still fail the objective if you get shot. The most useful cheats to use for this one are Infinite Deadeye and Golden Gun. You'll be able to wipe out all of the enemies before they get a chance to fire off a shot. If you're doing it without cheats, sticking to cover is your best option.
All Bounty Hunter challenges are much easier if you unlock and enable the "Invincibility", "Infinite Deadeye" and "Golden Gun" cheats. For more info, read about Cheats in Red Dead Revolver.
Next Mission